1 Getting Started
Requirements:
- An Arduino-compatible Board.
- Arduino IDE 1.6.6 (or higher).
- A (micro) sd module (you can use the one on ethernet shield or a spare one).
- An ethernet shield (optional).
During the development i worked with and Arduino UNO + Ethernet Shield W5100.
Download & Installation:
AVIL is basically an Arduino library that can be included in your sketch.
What you have to do is to download it from this github repo and put it in the Arduino libraries folder of your PC.
A second library is required (to allow files operations) and you can download it from here -> ./Fat16.zip or from its github repo.
You must install both these library in ordet to get AVIL working!
If you don't know hot to install an Arduino library see this.
In the github repo you'll also find an "sd" folder with a collection of AVIL programs...copy them all to your sd!
Your first AVIL program:
A very basic sketch to run an AVIL program from your micro sd card look like this:
1 #include <avil.h>
2
3 avil interpreter;
4
5 void setup(void) {
6
7   if(!interpreter.init()){
8      //something wrong during initialization...want to do something?
9   }
10
11   //run the program blink on sd
12   interpreter.run("blink.av");
13 }
14
15
16 void loop(void) {
17   //nothing to do here...
18 }
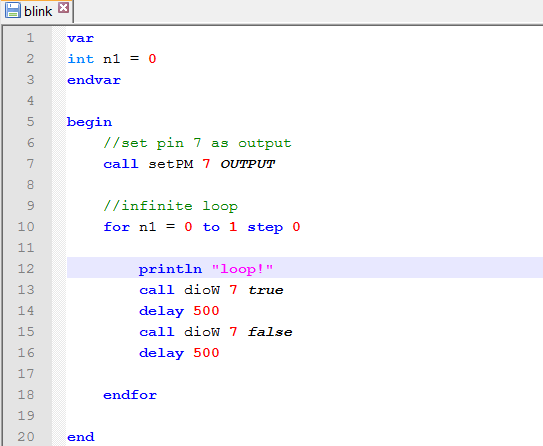
While the "blink.av" program written in AVIL (stored on the sd card) looks like this:
(You can get a notepad++ syntax highlighting for AVIL here -> ./avil_syntax.xml ...just click on Language->Define your language->Import to import it)
You can connect with a serial monitor or a telnet client to see the output produced by your program.
At this page you'll find a some examples to help you realize your application in AVIL, but first, have a look here to learn some fundamentals!